
Improving Spam Filtering with ChatGPT
For my 80-year-old father-in-law, receiving hundreds of spam messages daily can be overwhelming and frustrating, even when these emails end up in the ‘Junk Email’ folder. He feels pressured to go through the massive pile of emails every day, even though it’s often unnecessary. Moreover, legitimate emails occasionally land in the ‘Junk Email’ folder. To ease his burden, I developed an automated solution using ChatGPT and PowerShell. This combination intelligently classifies and moves spam emails to the ‘Deleted Items’ folder, making his inbox and ‘Junk Email’ folder more organized and secure. When my father-in-law first told me about his problem, I couldn’t believe he was receiving so much spam, especially since I rarely encounter such issues. After offering to manage his ‘Junk Email’ folder, it turned out to be a serious issue.
Wanting to resolve this problem for him, I got to work. As my father always used to say, “Your education is finally paying off; I didn’t invest in it for nothing!” 😊
Prerequisites
Before you start, ensure you have the following:
- PowerShell Core: Installation guide available here
- OpenAI API Toegang: Sign up with OpenAI and obtain an API key. Note that you’ll need to purchase credits to use the API.
- Microsoft Graph Module: Required for managing emails. Install it after setting up PowerShell Core using the command below.
- Zabbix Sender (Optional but fun to add): For monitoring and alerting.
- Credentials voor de mailbox: Necessary to read and move emails.
To install the module, run:
Install-Module -Name Microsoft.Graph -Scope CurrentUser
Integrating ChatGPT with PowerShell
Securing Your API Key
Store your OpenAI API key securely using environment variables to prevent exposure.
Set Up in PowerShell
$env:OPENAI_API_KEY = "je-openai-api-sleutel"
Spam Classification Function
Function Get-SpamClassification {
    param(
        [string]$Subject,
        [string]$FromName,
        [string]$BodyContent
    )

    $apiKey = $env:OPENAI_API_KEY
    $apiUrl = "https://api.openai.com/v1/chat/completions"

    $messages = @(
        @{
            role = "system"
            content = "Je bent een e-mail spam classifier. Analyseer de e-mailinhoud en classificeer het als 'Spam' of 'Niet Spam'. Geef alleen de classificatie zonder extra tekst."
        },
        @{
            role = "user"
            content = @"
Classificeer de volgende e-mail als 'Spam' of 'Niet Spam'.

Onderwerp: $Subject
Van: $FromName
Inhoud: $BodyContent

Classificatie:
"@
        }
    )

    $payload = @{
        model = "gpt-3.5-turbo"  # Gebruik "gpt-4" indien toegankelijk
        messages = $messages
        temperature = 0  # Voor deterministische reacties
        max_tokens = 10
    } | ConvertTo-Json -Depth 3

    $headers = @{
        "Content-Type"  = "application/json"
        "Authorization" = "Bearer $apiKey"
    }

    try {
        $response = Invoke-RestMethod -Uri $apiUrl -Method POST -Headers $headers -Body $payload
        $classification = $response.choices[0].message.content.Trim()
        return $classification
    }
    catch {
        Write-Host "Fout bij het aanroepen van de OpenAI API: $_"
        return $null
    }
}
Implementing the Spam Cleaning Workflow
The following example demonstrates how to retrieve, classify, and move emails marked as spam:
# Connect to Microsoft Graph
Connect-MgGraph -Scopes "Mail.ReadWrite"

# Define mailbox and folders
$userId = "your-email@example.com"
$sourceFolderName = "Junk Email"
$destinationFolderName = "Deleted Items"

# Retrieve the destination folder ID
$destinationFolder = Get-MgUserMailFolder -UserId $userId -Filter "displayName eq '$destinationFolderName'"
$destinationFolderId = if ($destinationFolder.Count -gt 1) { $destinationFolder[0].Id } else { $destinationFolder.Id }

# Retrieve emails
$emails = Get-MgUserMailFolderMessage -UserId $userId -MailFolderId $sourceFolderId -All

foreach ($email in $emails) {
    $subject = $email.Subject
    $from = $email.From.EmailAddress.Name
    $body = $email.Body.Content

    $classification = Get-SpamClassification -Subject $subject -FromName $from -BodyContent $body

    if ($classification -eq "Spam") {
        # Move email to 'Deleted Items'
        Move-MgUserMessage -UserId $userId -MessageId $email.Id -DestinationId $destinationFolderId
        Write-Host "Moved spam email: $subject"
    }
    else {
        Write-Host "Email not classified as spam: $subject"
    }
}
As shown in the above code, you can use Microsoft Graph to access a mailbox under the free Outlook.com service. The only downside is that it requires an interactive login. Using the Connect-MgGraph command with an app registration or device login is not supported for Outlook.com mailboxes.
Result
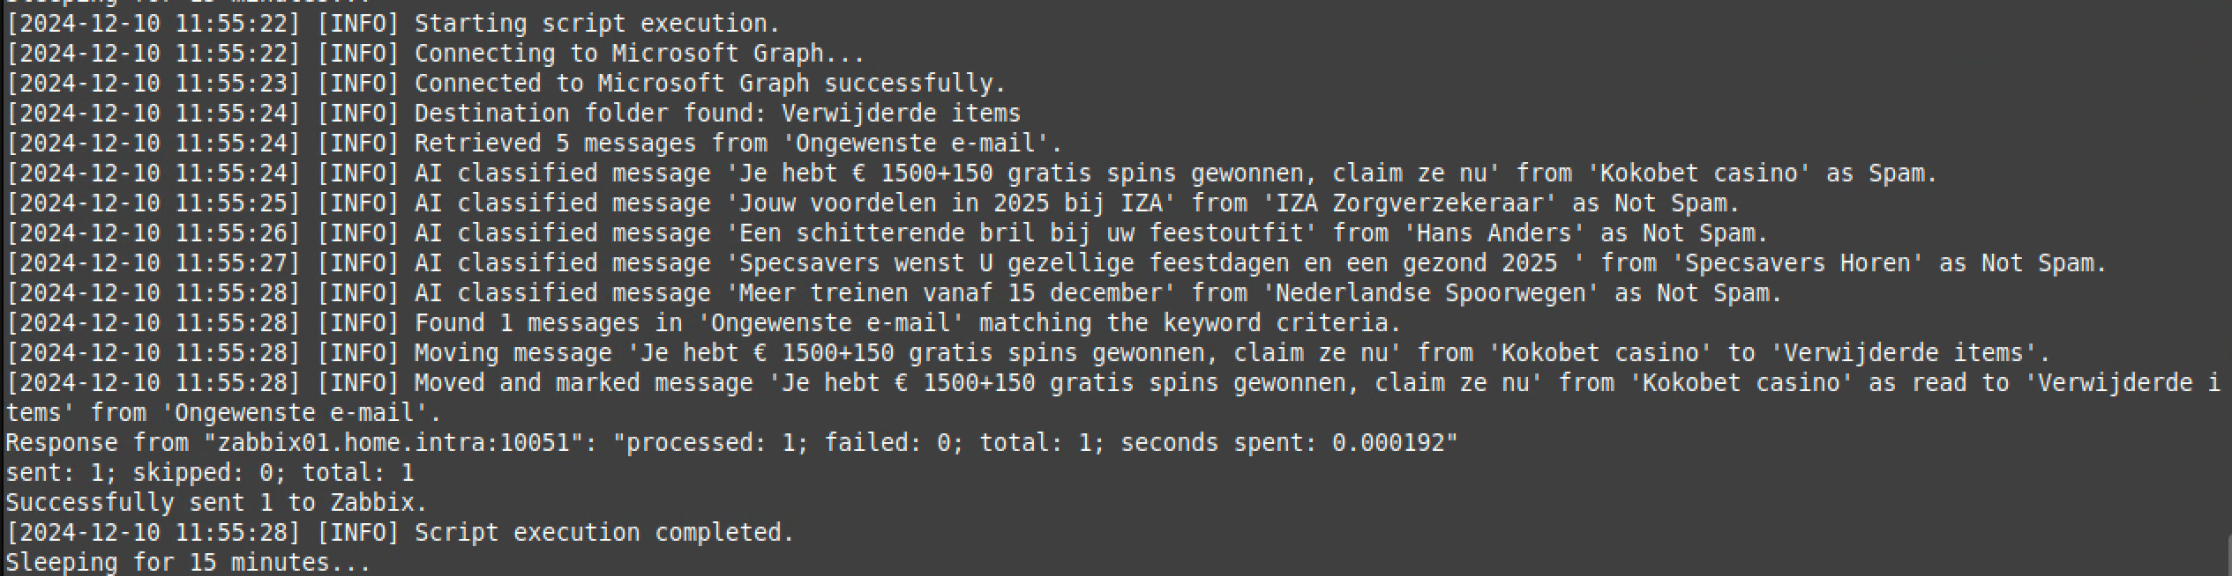
I run the script on a Linux Mint virtual machine since I need to perform an interactive login and prefer not to run it on my workstation. The complete script executes the necessary actions, sends the count of moved emails to Zabbix, logs all actions, and waits 15 minutes before scanning the mailbox again.
Here’s an example of the detection and movement:
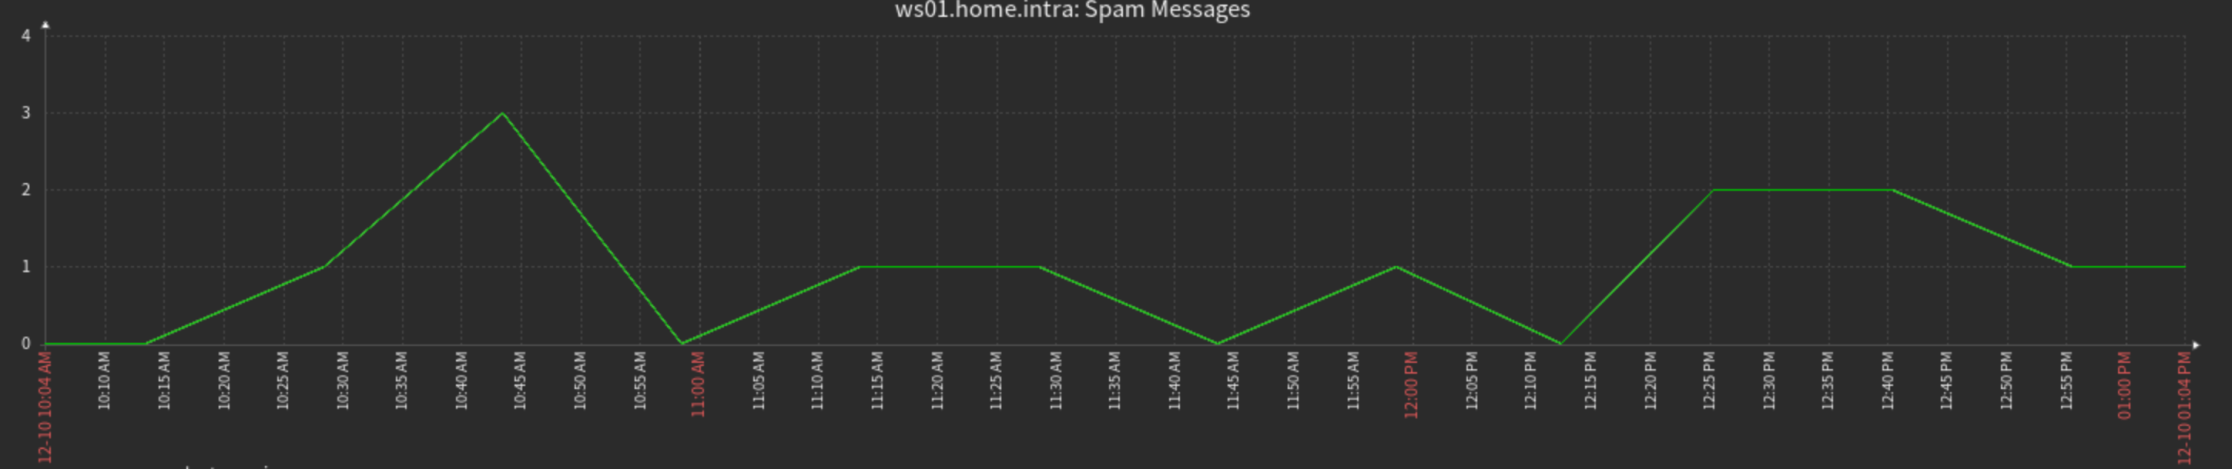
And, of course, the graph from Zabbix:
Conclusion
The goal was to relieve my father-in-law by taking over the management of spam emails. Now, only a few emails remain in the ‘Junk Email’ folder, which he can review and decide to delete or restore to his inbox if needed. I believe this solution is a success.
It gives me great satisfaction to give back to him while gaining valuable experience in combining PowerShell with ChatGPT.
Interested in the complete script? Feel free to let me know!